How to add a drop down navigation menu in Squarespace
Having too many links in your navigation bar is a major no-no, it can overwhelm people. You can easily clean up your navigation bar by adding a drop down menu in Squarespace, and that’s what I’m going to walk you through with a simple tech tutorial, including:
I mean, this looks way less messy than using 10 different links in your navigation bar, right? 👇🏻
I mean, this looks way less messy than using 10 different links in your navigation bar, right? 👇🏻
Remember that when it comes to your website, of course it should be pretty, but it should also be strategic and profitable. You need to tell people what’s the most important thing to pay attention to, especially to solve a problem that they have.
If you have 10 links in your navigation bar, what you’re telling website visitors is that ALL of those things are important. They’re going to feel overwhelmed, confused, and like they don’t know where to start … and so they’re not going to start.
They’ll end up clicking away from your website, most likely to never come back.
It’s hard to see your website like a first time visitor, since you’ve been most likely looking at it for months, if not years. If you want to know if your website is confusing, ask a friend or family member to give you an honest (and hopefully kind!) critique.
Adding a drop down menu to your navigation bar is one of the easiest things you can do to make your website simpler and more effective, and if you use Squarespace, it should only take you 5 minutes to do.
Ready? Let’s go!
How to add a drop down menu in Squarespace
1. Navigate to the Pages menu from the backend of your Squarespace website.
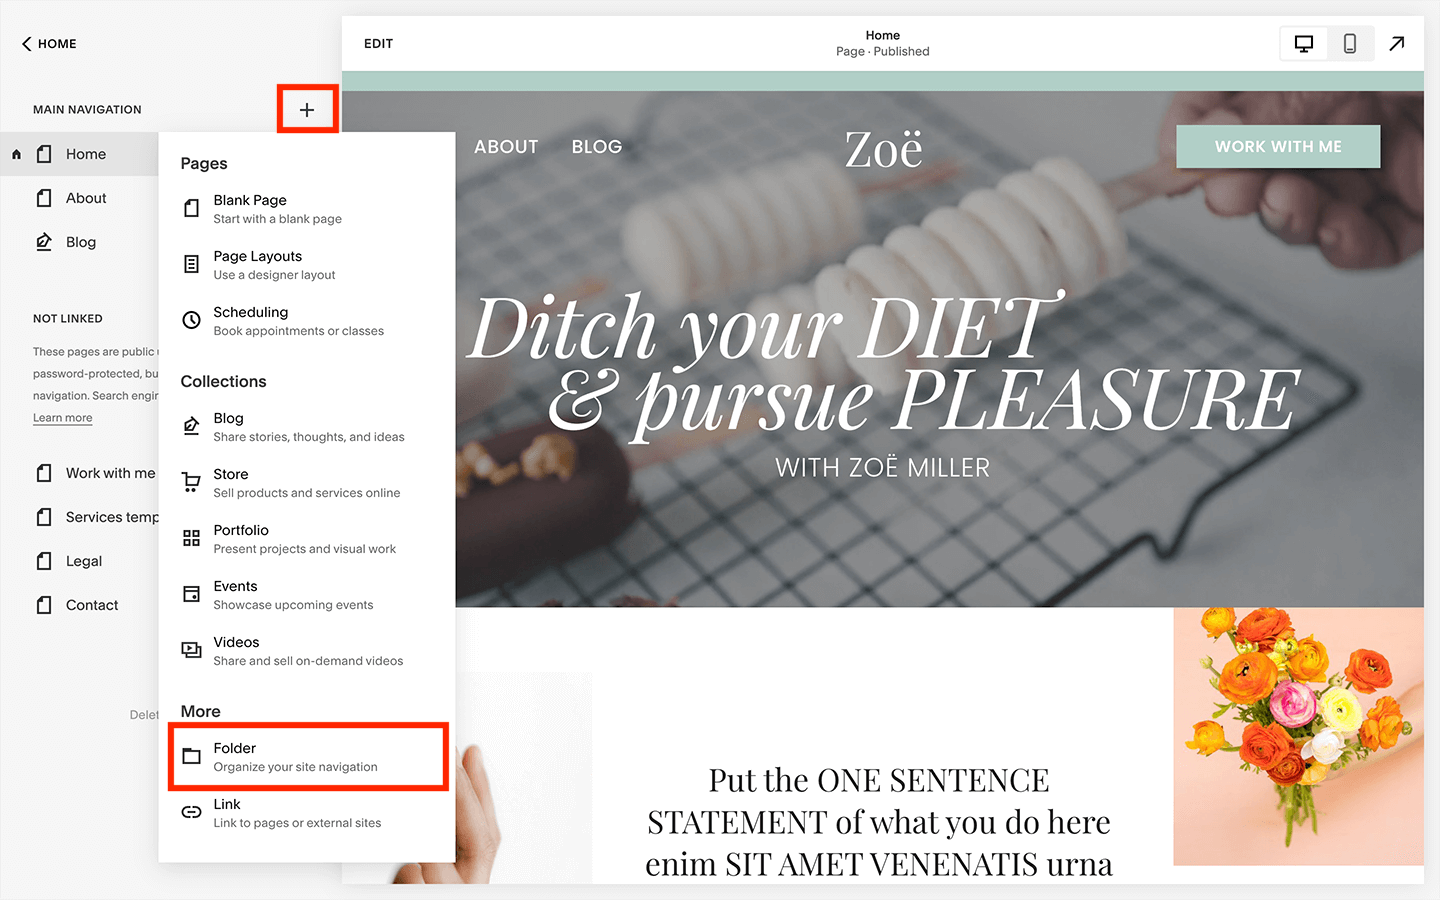
2. Add a folder to your main navigation bar by clicking on the + sign to the right of where it says “Main navigation”, then choose “Folder”.
3. Change the order of your navigation menu bar by clicking on the new folder you created, and while holding down the mouse button, drag it upwards or downwards. The order of the navigation bar on your site from left to right is represented by top to bottom on this main navigation section.
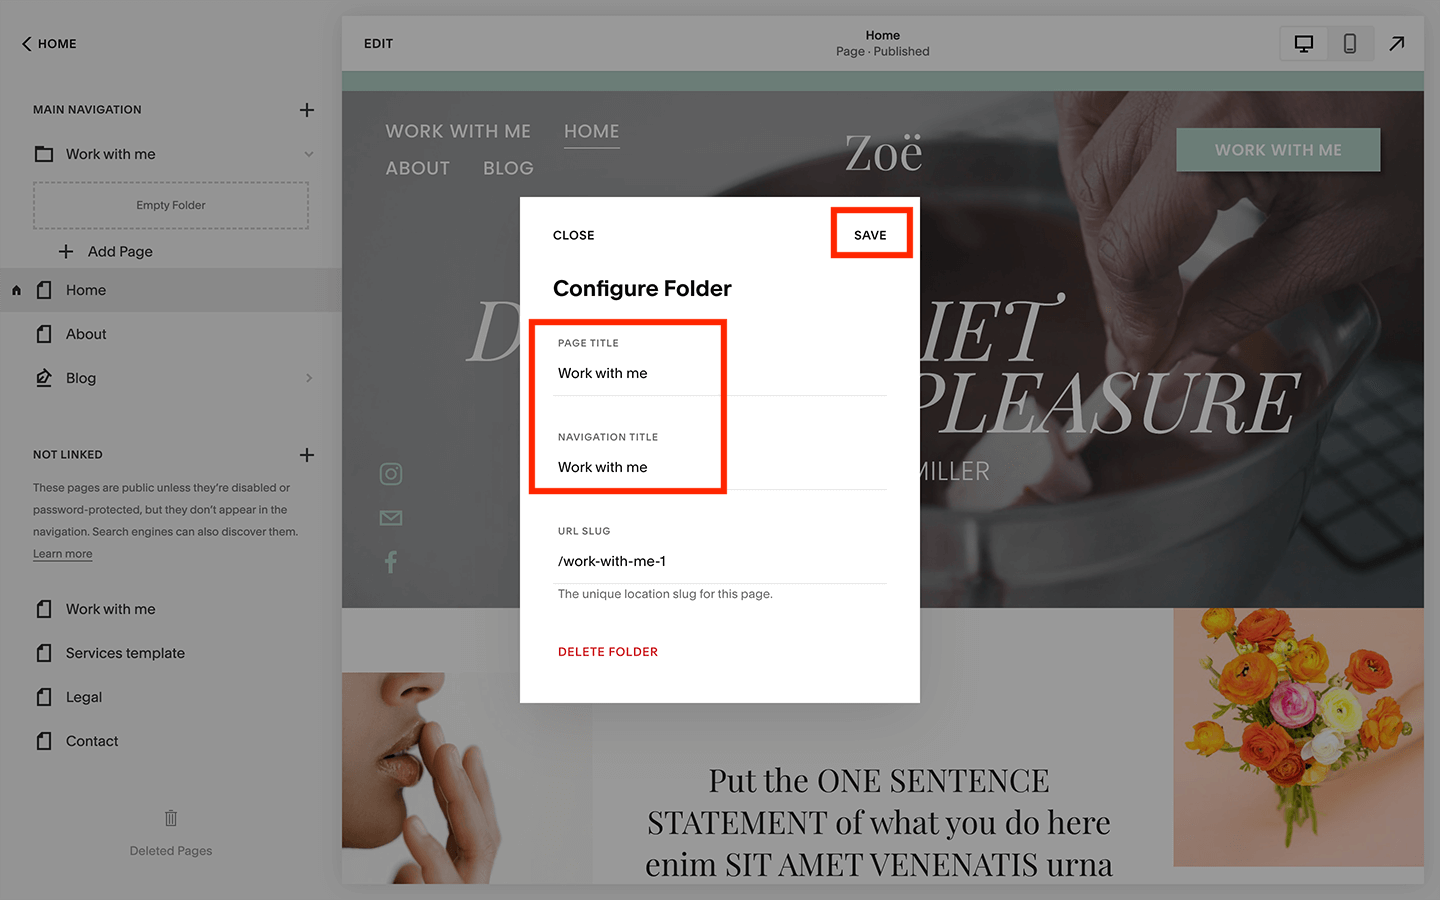
4. Change the name of the folder as it shows up in your navigation menu by clicking on the gear icon to the right of the folder name, which will open the “Configure folder” menu. Change the page title and navigation title, and click save from the top right hand corner of that menu.
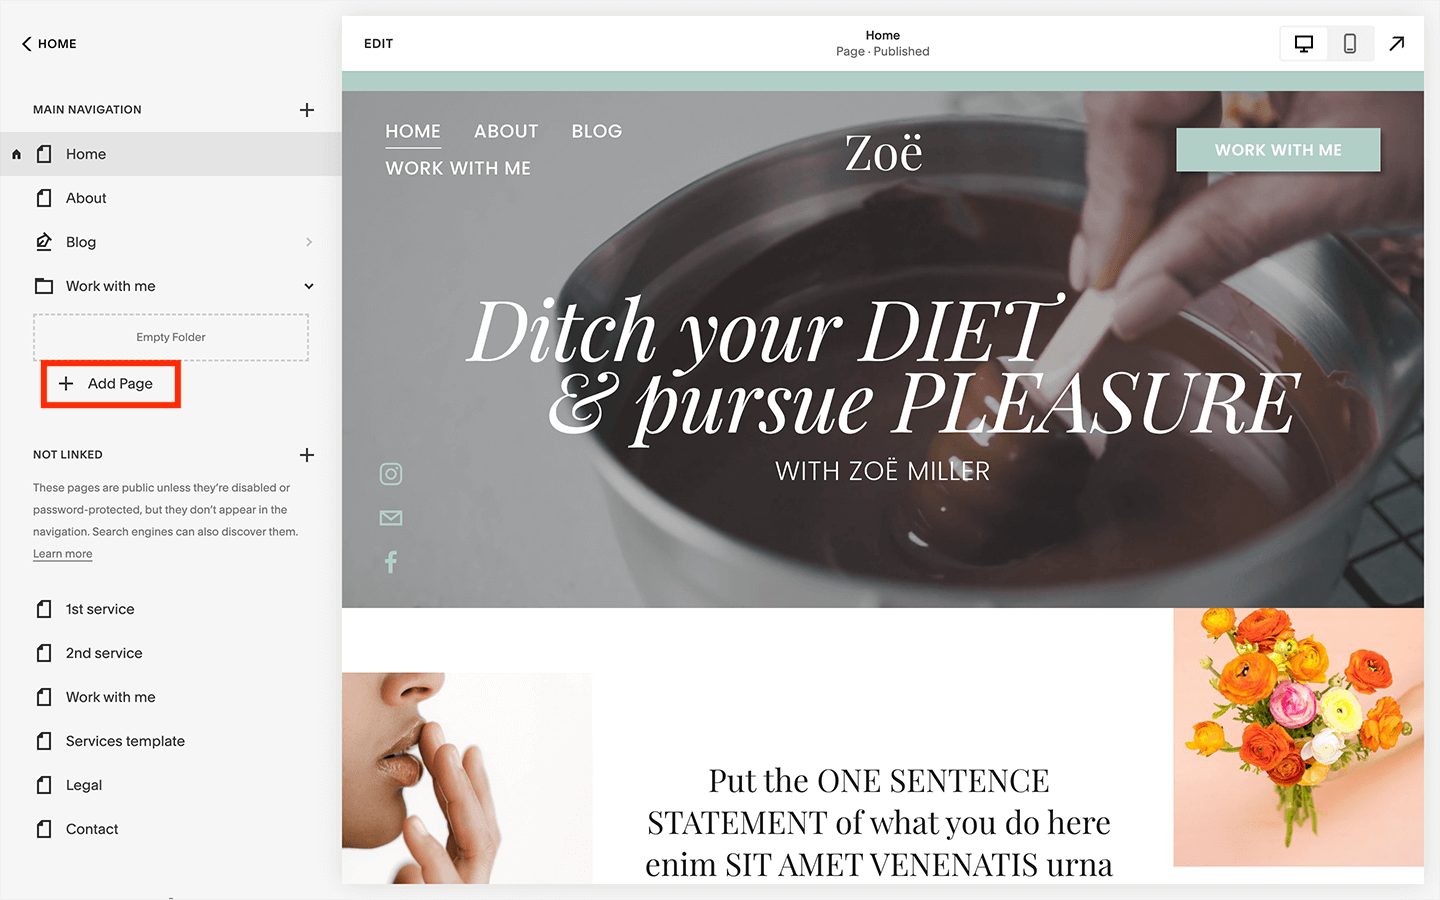
5. To move pages that you’ve already created into the folder so they show in the drop down menu, simply hover over the page name, hold down the button on your mouse, and drag it inside the menu between the name of the folder and the “Add page” button.
You can reorder the pages within the folder by dragging them upwards or downwards within the folder.
6. If you want to add links to external websites in a drop down menu in Squarespace (for example, for website visitors to follow you on different social media platforms), click on “Add Page” within the folder, then choose “Link” from the bottom.
Change the link title as you would like it to show up in the drop down menu, and drop in the external link. Then click on the gear icon to the right of the link.
Toggle on the option to open in an external window (a best practice when clicking on a link from your website that opens an external one), then click on “Save” in the top left hand corner, and then “Save” again from the right hand corner on the next menu.
How to change the drop down menu style in Squarespace
Interestingly enough, for how easy it is to use Squarespace, they don’t allow you to change the settings on a drop down menu. However, we can easily do this with some simple CSS code!
If you’re never used custom code on a Squarespace menu before, don’t freak out. I’m going to walk you through it below. I promise it won’t hurt.
1. Navigate to the Pages menu from the backend of your Squarespace website.
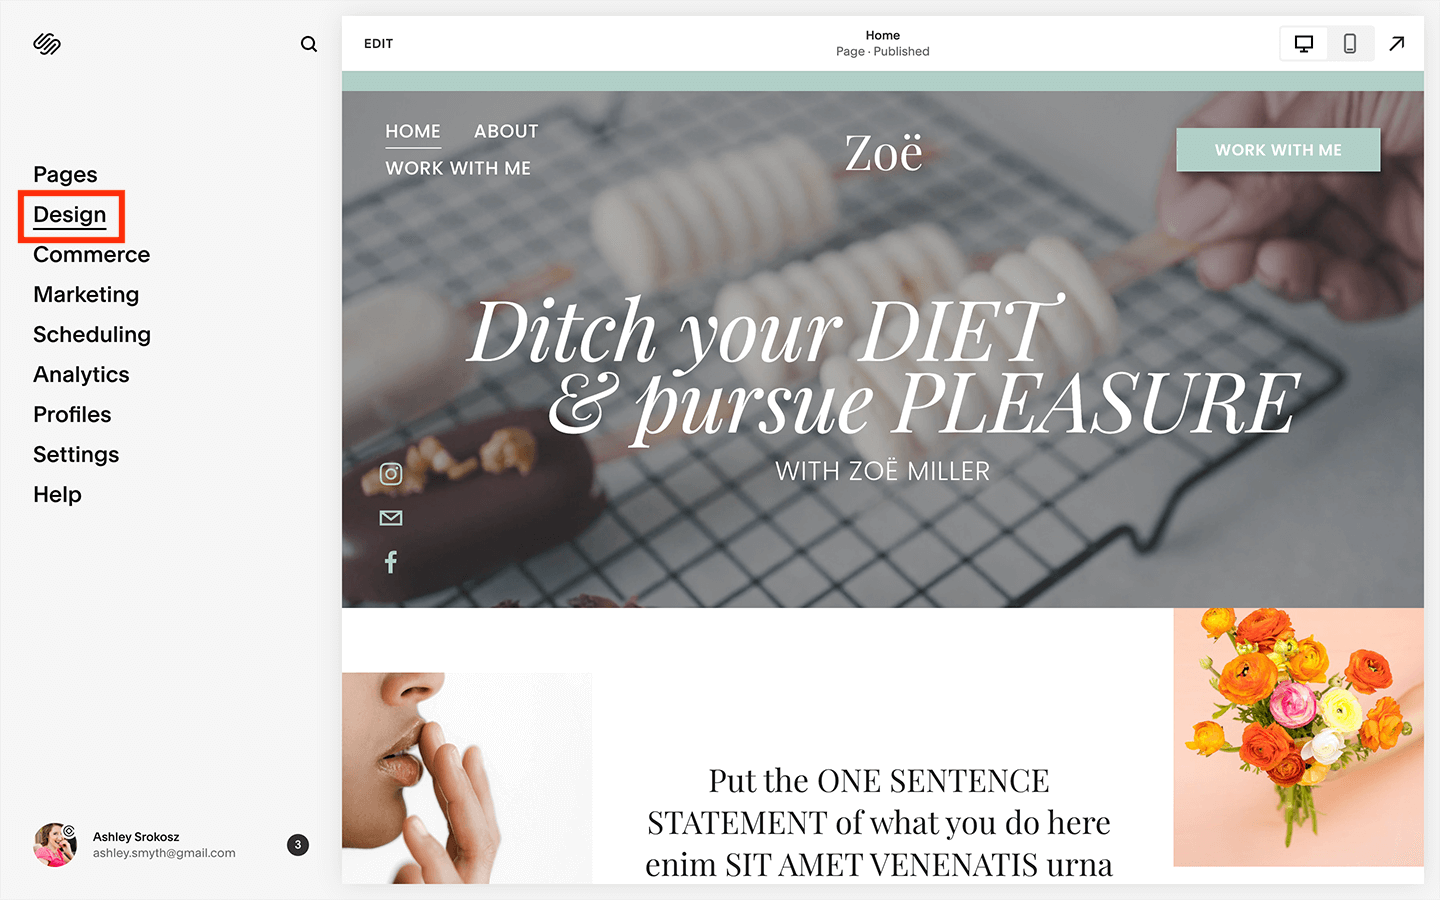
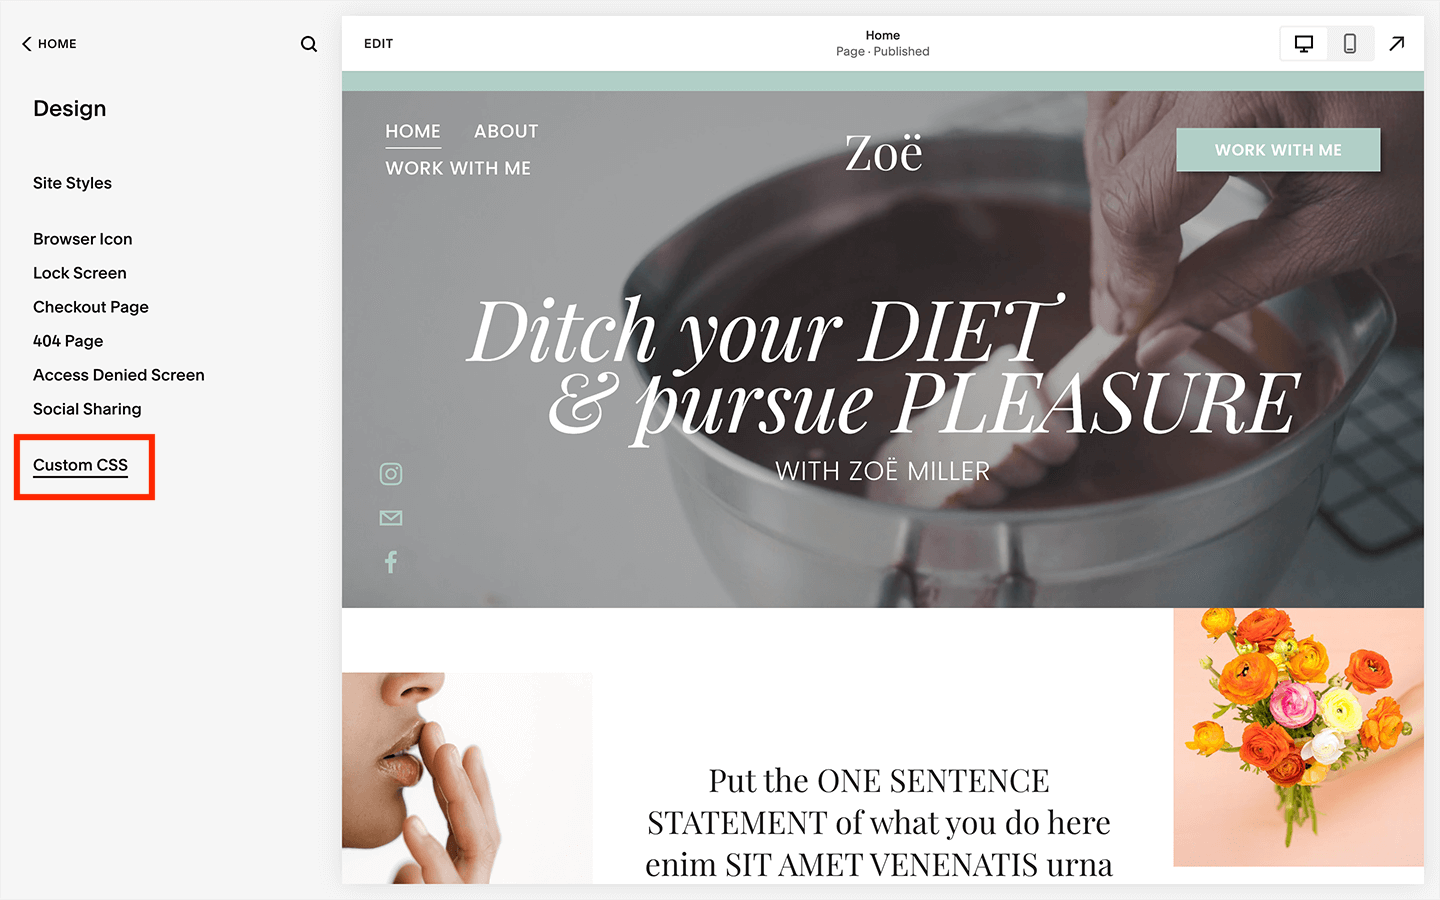
2. Open the Custom CSS panel from the design menu.
3. Cut and paste the following CSS code (everything in the grey box) into the design panel:
/*DROP DOWN NAV MENU SETTINGS*/
/*change colour of folder background*/
.header-nav-folder-content {
background-color: #XXXXXX !important;
}
/*change alignment of items in folder*/
.header-nav-folder-item {
text-align: left !important;
}
/*change text colour of items in folder*/
.header-nav-folder-item a {
color: #ffffff !important;
}
Here’s what it will look like when you add the code:
4. Replace the “#XXXXXX” hex code for the colour of the folder to one of your brand colours, and the “#ffffff” hex code for the colour of the item text that can be easily read. You can also change the alignment of the items in the folder by choosing left, right, or center.
5. You’re done! Always make sure to click on “Save” from the upper left hand corner when you’re done making any changes.
See? I told you that you don’t need to be afraid of using custom code on your Squarespace website.
Plus, when you change features on your website to match your brand, like changing the background colour of the drop down menu, it increases consistency and trust in your expertise (whether website visitors realize it or not!).
Anything that you can do to increase the user friendliness of your website should result in longer times spent on it, which means a greater chance that you’ll convert website visitors into customers into fans.
P.S. Want another tip for making your website visitors happy? Check out this blog post on using anchor points in Squarespace.
The beautiful part about Squarespace is you can easily change the layout of your content and navigation menu as your website grows. A drop down menu can easily be undone by dragging the pages out of it, then deleting the folder (don’t know how to delete a page? Click here).


